
39 DIY Christmas Gift Ideas – Craft Your Own Homemade Presents
Do-it-yourself gifts get a bad rap. Looking down on them as either cheap substitutes for store-bought gifts or too complicated, people often overlook homemade Christmas gifts as a source for delivering holiday cheer. But there are tons of ideas for handmade gifts your friends and family will love.
And there’s solid science to back up going the DIY route. Often, the best gifts aren’t about the cost. Instead, it’s the sentiment that adds the value. A 2015 study published in the Journal of Personality and Social Psychology found that the pleasure that comes from getting something new declines over time, but the sentimental value does not.
Plus, not only are DIY gifts special and unique, done right, they can save you money. Assuming you have a few basic tools, like scissors or a glue gun, you can do many of them for under $10 — some for under $5.
Finally, tons of DIY gift ideas are so simple to make even a DIY newbie can pull them off. You don’t need to know how to sew or crochet, bake, or do extensive carpentry. Nor do these ideas require any out-of-the-ordinary tools, like a vinyl cutting machine or a miter saw — just the kinds of common craft supplies many people already have plus a few basic supplies you can pick up at the dollar store, craft store, or grocery store.
So, whether you’re looking to save a little money on gifts this holiday season, need some creative DIY stocking stuffer ideas, or want to give friends and family something that comes from the heart, there are plenty of options for DIY gifts for every person on your holiday list.
DIY Christmas Gifts for Everyone
From holiday gifts for moms and dads to grandparents, aunts, uncles, siblings, and even boyfriends and girlfriends, there are dozens of ideas for handmade gifts for everyone on your list. Plus, there’s nothing resembling a macaroni necklace or hard-as-a-brick fruitcake in sight.
Homemade Bath & Body Gifts

Homemade bath and body products are beloved by everyone. After all, who couldn’t use a little R&R? Plus, they’re simple and quick to make — even kids can do it.
1. Gingerbread Bath Salts
This recipe gives a relaxing bath soak a fun and festive twist. But you can easily alter the ingredients to make any scent you want. Simply replace the gingerbread spices with 15 to 20 drops of essential oil, such as lavender.
Yields: 3 cups
Supplies
- 1 large bowl
- 1 whisk
- 2 cups Epsom salts
- 1/2 cup sea salt
- 1/2 cup baking soda
- 1 teaspoon cinnamon
- 2 teaspoons ground ginger
- 1 teaspoon ground nutmeg
- 1 (25-ounce) Mason jar with a hinged lid
- 1 decorative gift tag
- Ribbon
- Hole punch (optional)
Directions
- In the large bowl, whisk the Epsom salts, sea salt, baking soda, cinnamon, ginger, and nutmeg until the spices are evenly distributed.
- Pour the bath salts into the jar, and seal the lid.
- Write the following instructions on the back of your decorative gift tag: “Dissolve 1/2 cup in bathwater,” and then thread it onto a festive ribbon (use a hole punch to create a hole for the ribbon if your tag doesn’t have one). Tie the ribbon around the neck of the jar.
Note: Dandelion Paper on Etsy has some cute options for gingerbread gift tags.
2. Candy Cane Sugar Scrub
This recipe uses a peppermint scent and a layering effect for a seasonal take on a moisturizing, exfoliating scrub. The coconut oil solidifies at room temperature — that’s one of the benefits of using it in this recipe. It keeps the candy cane layers from combining. When your recipient uses it, the warmth of their hands melts the oil.
Yields: 3 cups
Supplies
- 1 large microwave-safe bowl
- 3/4 cup refined coconut oil
- 3 cups granulated sugar
- 1 wooden spoon
- 10 – 15 drops peppermint essential oil
- 1 medium glass or stainless steel bowl
- Red food coloring
- 1 (25-ounce) Mason jar with a hinged lid
- Ribbon
- 1 decorative gift tag
Directions
- In the large microwave-safe bowl, microwave the coconut oil in 30-second increments until just melted.
- Add the sugar, and use the wooden spoon to mix. Add 10 to 15 drops of peppermint oil to your preferred strength, and stir to combine.
- Transfer half the sugar scrub into the medium glass or stainless steel bowl. It’s best to use glass or stainless steel, as other materials might become tinted when you add the food coloring. Add 1 to 2 drops of red food coloring to the medium bowl, and mix thoroughly. You want just enough to tint this half of the sugar scrub pink. Too much food coloring could stain the user’s skin or bathtub.
- Scoop some of the white sugar scrub into the jar, and tamp it down. Then repeat with some of the pink. Keep alternating layers until you’ve filled the jar. Seal the lid.
- Tie a festive ribbon around the neck of the jar. Write the following instructions on your gift tag: “To use, rub a small amount between your hands to melt the oil. Smooth it over any areas in need of exfoliation.” Affix the tag to the jar.
Note: Mabb Rose Designs on Etsy has an editable tag that’s perfect for this gift. Just edit the ingredients to match this recipe.
3. Sugar Cookie Milk Bath
Milk baths provide a luxurious and soothing spa-like experience. The lactic acid in milk helps exfoliate dead skin cells, resulting in soft, glowing skin. And the vanilla in this recipe gives it a sweet-smelling holiday vibe.
Yields: 4 cups
Supplies
- 1 large bowl
- 1 whisk
- 2 cups powdered milk
- 1 cup cornstarch
- 1/2 cup baking soda
- 1/2 cup Epsom salts
- 15 – 20 drops vanilla essential oil
- 1 (32-ounce) Mason jar with a hinged lid
- 1 decorative gift tag
- Ribbon
- Hole punch (optional)
Directions
- In a large bowl, whisk the powdered milk, cornstarch, baking soda, and Epsom salts.
- Whisk in the vanilla essential oil a few drops at a time until you reach your preferred strength.
- Pour the milk bath into the jar, and seal the lid.
- Write the following instructions on the back of the gift tag: “Add 1/2 cup to running bathwater,” and then thread it onto a festive ribbon (use a hole punch to create a hole for the ribbon if your tag doesn’t have one). Tie the ribbon around the neck of the jar.
Note: Cat Bone Design on Etsy has a sugar cookie-themed gift tag perfect for this gift.
4. Coffee-Scented Soap
For a much-needed pick-me-up on early mornings, set up the recipient on your list with some soap infused with coffee grounds. The grounds help exfoliate skin. Plus, according to Healthline, coffee comes with the added benefits of being anti-inflammatory, antibacterial, and antiaging. If you’re new to soap-making, go with an easy melt-and-pour recipe using goat’s milk soap base, coffee grounds, and coffee essential oil. For an even more delicious fragrance, try adding some vanilla essential oil.
Get the full instructions on Happiness is Homemade.
5. Rosemary-Mint Shaving Cream
Shaving cream is an ideal bath and body gift suitable for anyone, especially if you opt for the refreshing herbal scents of rosemary and mint. Combine coconut oil, shea butter, and either jojoba oil or almond oil (you could also use olive oil) with mint and rosemary essential oils. It’s the same combination of ingredients I use on my skin daily, which leaves it smooth and soft. Your loved one may never want to go back to the store-bought kind in a can.
Get the full instructions on Food for My Family.
6. Herbal Aftershave
The astringents in aftershave, such as witch hazel, reduce irritation and refresh the senses. Homemade healing aftershave incorporates jojoba oil and vitamin E for extra-soothing skin benefits. You can pair this gift with the homemade shaving cream and match the same rosemary-and-mint scent. Or use any skin-soothing essential oils you have on hand, like geranium or chamomile.
Get the full instructions on Evermine.
7. Beard Oil
Homemade beard oil is a DIY gift every bewhiskered recipient can use. Mix a carrier oil, like almond or jojoba, with some essential oils. Try rosemary and mint if you’re making a complete grooming set gift basket along with the shaving cream and aftershave. Then package the oil in a small amber dropper bottle and finish it with a printed label.
Get the full instructions on Everything Etsy.
8. Hidden Surprise Bath Bombs
Bath bombs are a perennial favorite beloved by all ages, and they’re an easy yet impressive DIY. This year, up your bath bomb game by hiding a special surprise inside for a unique gift for anyone on your list, from 9 to 99.
A small plastic toy — like a plastic dinosaur — that slowly appears as the bath bomb melts is a delight for kids. For an adult gift, try hiding inexpensive (even homemade) jewelry like a ring or necklace. Or opt for a personalized message printed on a slip of paper. For tweens or teens, opt for a monetary surprise.
Anything smaller than 2 inches works well for a bath bomb between 2.5 and 3 inches. You can make anything that can’t get wet, such as surprises made of paper, waterproof by tucking them inside a vending machine capsule. In fact, you can also use vending machine capsules (or even plastic Easter eggs) as bath bomb molds. Just adjust the size of your surprise to fit.
You can also use the same recipe to make bath bombs without the surprise. And no matter the age, bath bombs make excellent stocking stuffers.
Yields: 6 (depending on the size of the mold)
Supplies
- 1 large bowl
- 1 whisk
- 1 cup baking soda
- 1/2 cup Epsom salts
- 1/2 cup cornstarch
- 1/2 cup citric acid
- 2 tablespoons fractionated coconut oil
- Food coloring (any color or combination)
- Essential oil (any scent or combination)
- Water in a spray bottle
- Small gifts (no larger than 2 inches)
- Vending machine balls large enough for your gifts (optional)
- Round bath bomb molds
- Shrink-wrap bags or airtight container
Directions
- In a large bowl, whisk the baking soda, Epsom salts, cornstarch, and citric acid until thoroughly combined.
- Very slowly add coconut oil while whisking. Don’t add any wet ingredients too fast, or you’ll activate the fizzing action prematurely.
- Slowly add a food coloring of your choice, a few drops at a time, and whisk it in. Continue adding a few drops at a time until you reach your desired shade.
- Add 1 to 4 drops of essential oil.
- Using the water bottle, lightly spritz the mixture and quickly mix it in by hand. Keep spraying and mixing, one spritz at a time, until the mixture resembles wet sand. You want it just moist enough that it holds together when packed, but no wetter.
- Firmly pack a little bit of the mixture into your mold. Then place the surprise inside and keep pressing and packing around it. Fill the top half of the mold, and carve out a hole large enough for the surprise to squeeze inside, keeping the mixture packed firmly. It doesn’t have to be exact, as any extra mix will easily squeeze out of the mold. Press the two halves of the mold together.
- Allow it to dry for 30 minutes, then carefully remove the top half of the mold.
- Let it dry completely overnight, remove the bottom half of the mold, and package the bath bomb in a shrink-wrap bag or airtight container.
Handmade Jewelry Gifts
Making handmade jewelry is another doable DIY. And while it may conjure memories of pasta necklaces, it’s possible to make something classy and elegant your friends and family can wear proudly.
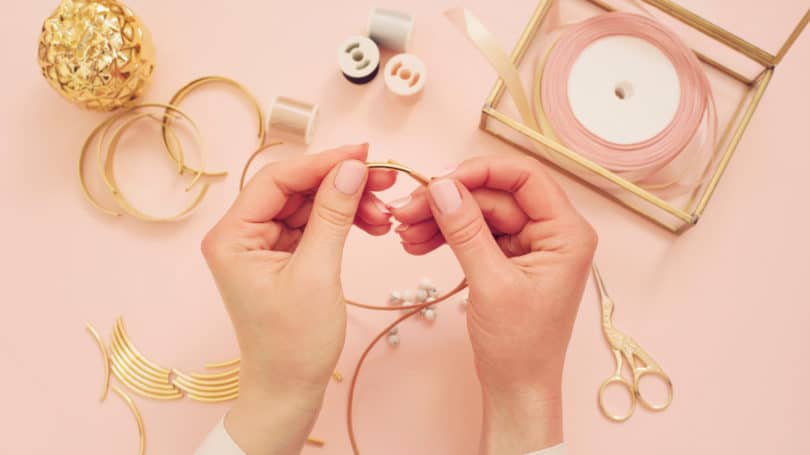
9. Hand-Beaded Jewelry
Beaded jewelry-making can encompass every skill level, depending on the project.
- Ombre Seed Bead Necklace. Skilled beaders can try an intricate ombre seed bead necklace, which involves stringing very tiny beads in a color gradient across multiple strands. Get the full instructions on How We Live.
- Easy Beaded Bracelet. Less experienced beaders can opt for a simple yet beautiful bracelet that involves stringing large beads onto jewelry wire and closing it with a clasp. Get the full instructions on Crazy Little Projects.
- Kid-Friendly Name Necklace. For younger kids who need a simpler DIY, use stretchy nylon beading cord to make a necklace or bracelet. String alphabet beads to spell a phrase like “I love Mom” or the recipient’s name. Surround the alphabet beads with multicolored beads in the recipient’s favorite colors. Or for an extra-special touch, opt for gemstone beads. Get the full instructions on Rhythms of Play.
- Ribbon and Wood Bead Necklace. String wooden beads onto a wide ribbon, and tie a bow that hangs on the side. It’s a simple DIY that nevertheless looks elegant. Get the full instructions on Decor & The Dog.
10. Glass Tile Jewelry
Using special artwork or a cherished photo, you can make beautiful and unique jewelry with lasting sentimental value. Options include necklaces, bracelets, rings, earrings, keychains, tie pins, and cufflinks.
And if the artwork or photo you want to use isn’t already digital, don’t worry. You can scan it into your computer or use a camera or smartphone to photograph and upload it.
Supplies
Directions
- Using a photo editor like Preview for Mac or Paint.net for PC, size your image to the dimensions of your glass tile. Then print it on white card stock, and use scissors to cut it to size.
- Put a pea-size amount of Mod Podge on your tile. Use the paintbrush to spread it out so it covers the entire surface. Use the toothpick to pop any air bubbles in the glaze.
- Set your image face down on the tile. With a clean finger, lightly press down. Allow it to dry for 5 to 10 minutes.
- Using the paintbrush with another pea-size amount of Mod Podge, paint the back of your image to better seal it to the glass. Let it dry for 2 to 3 hours.
- In the tray that will hold your glass tile, put a drop of super glue. Press the glass tile into the tray.
11. A Glitter Necklace
To make a stunning glitter necklace, you only need some Mod Podge Dimensional Magic, a round bezel (pendant tray), and glitter in multiple colors. Apply some Mod Podge to the bezel, follow with glitter, and let it dry. Then layer on more Mod Podge and more glitter. In the end, you have a sparkling resin-filled pendant with a layered glitter effect.
Get the full instructions on Clumsy Crafter.
12. A Marbled Clay Ring Dish
Make a beautiful ring dish from multicolored oven-bake polymer clay, gold liquid gilding, and Sculpey glaze. Twist together 5-inch ropes of clay in several complementary colors, roll them into a ball, and roll the ball flat. This technique makes the clay look like marbled paint once flattened. Then you just mold it to the shape of an oven-safe bowl, and bake it according to the package directions. Once it’s cool, paint the rim with the gold gilding.
Get the full instructions on A Beautiful Mess.
Homemade Wearable Art Gifts
In addition to jewelry, there are multiple easy-to-make accessories and wearables your friends and family will love showing off.
13. A Hand-Painted Silk Scarf
There are all kinds of beautiful ways to paint and dye inexpensive silk scarves to produce a one-of-a-kind gift. An easy beginner project that requires no advanced skills or artistic abilities involves using permanent markers to create a watercolor effect.
You just use permanent markers to draw shapes and squiggles all over a vinegar-treated scarf. Then use a spray bottle to saturate the scarf in rubbing alcohol and let it sit for the colors to disperse. You can then use a dropper to release more rubbing alcohol in strategic locations — wherever you want to distribute even more color. Then set the color using more vinegar, the microwave, and an iron.
Get the full instructions on Your Decorative Painting Resource.
14. A Hand-Decorated Tie
Turn an inexpensive white tie into a wearable artistic masterpiece. The design options are infinite. If you have artistic talent, use brush-on fabric paint or fabric markers to create your own image. If you’d rather not freehand, use transfer paper to trace a design you can paint over. Or use the permanent marker technique outlined for the hand-painted scarf to create a watercolor or tie-dye effect. And if this is a gift from a little one, they can use fabric markers or fabric crayons to draw custom designs.
15. A Painted Pouch
Everyone needs a place to tote essentials like cash, hand sanitizer, and lip balm. A pouch displaying kids’ artwork, a photograph, or a favorite print will make the recipient smile every time they use it.
Just print the image you want to use on iron-on transfer paper. Then peel the backing from the transfer paper and iron it onto a canvas pouch.
See an example on Parents Magazine.
16. A Customized T-Shirt
It’s fairly easy to DIY your own design on a T-shirt. Choose a favorite quote in a stylish font, an inside joke, or a special image.
You can print your design onto T-shirt transfer paper and follow the package instructions to permanently print the image on a blank shirt.
Or go with iron-on letters. Though craft stores typically only sell them in black or white, you can make your own colorful letters by painting them. Opt for solid colors or an effect like rainbow, ombre, or checkers.
Get the full instructions on Studio DIY.
If you have more experience with drawing, use a simple bleach pen to create intricate designs like mandalas or bohemian-style flowers on a colored T-shirt. Just plan your design, place foam board or cardboard between the T-shirt layers, and draw away.
Get the full instructions on Cloth Paper Scissors.
Homemade Food Gifts

Everyone loves a scrumptious treat, especially at Christmastime, when gifts of candy and cookies are the norm. And you can make delicious treats for the foodies in your life, even if you aren’t a Master Chef.
17. Hot Chocolate Bombs
Hot chocolate bombs are trending for 2020. These involve melting chocolate and using a silicone mold to make a hard-shell sphere. You can make it using dark, milk, or white chocolate. Then you fill the sphere with the usual hot chocolate mix, plus fun mix-ins like mini marshmallows or crushed peppermints. When you drop the bomb into warm milk or water, the chocolate sphere melts and releases the hot chocolate mix. Then you just stir and enjoy.
Get the full instructions on Owl Baking.
18. Homemade Candy
For those who enjoy baking, making homemade treats is an annual Christmastime ritual. And friends and family who don’t enjoy baking are always thankful someone else does.
Plenty of people love homemade cookies. But if you’re looking for something more special, go with homemade candy. While some candy recipes can be tricky, there are lots of easy-to-make confections. Anyone on your list would welcome a Christmas present of homemade fudge, peanut brittle, or brigadeiro (Brazilian chocolate truffles).
Or try some easy homemade marshmallow fluff. It’s incredibly versatile, and kids love it. Your gift recipient can put a dollop on top of hot cocoa or ice cream, make s’mores or fluffernutter sandwiches, or use it in place of meringue on top of pie. You can even use a kitchen torch to toast it.
And if younger kids want to try their hands at making homemade goodies, simple chocolate dip recipes, like hot chocolate spoons and candy cane marshmallow pops, are easy but impressive gifts.
19. Infused Syrup
The cafephiles and mixologists on your list will love an infused syrup they can use in their coffee, cocktails, and artisanal sodas.
Yield: 1 cup
Supplies
- 1 small saucepan
- 1 wooden spoon
- 1 cup granulated sugar
- 1 cup water
- Whole herbs or spices, such as cinnamon, lavender, or mint (see note)
- 1 fine-mesh strainer
- 1 medium bowl
- 1 Funnel
- 1 decorative glass bottle with an airtight lid
- Ribbon
Directions
- In the small saucepan over medium heat, combine the sugar and water and stir with the wooden spoon until the sugar is completely dissolved, about 1 to 2 minutes. Bring it to a boil, then reduce the heat to low.
- Add your chosen herbs or flavorings, and let it simmer for 5 to 10 minutes, depending on how much flavor you want to extract. Remove it from the heat, and let it cool completely.
- Situate the fine-mesh strainer over the medium bowl, and strain the syrup, discarding the herbs or spices. Use the funnel to pour the syrup into the glass bottle carefully, and tie it with a festive ribbon.
Note: Visit Imbibe magazine for an extensive collection of infused syrup recipes, including flavor pairings and herb or spice amounts.
Handmade Home Goods Gifts
Making gifts for the home is a way to combine a special gift with something practical people can really use. That ensures your gift remains a daily reminder of your love and care rather than getting tucked into a closet.
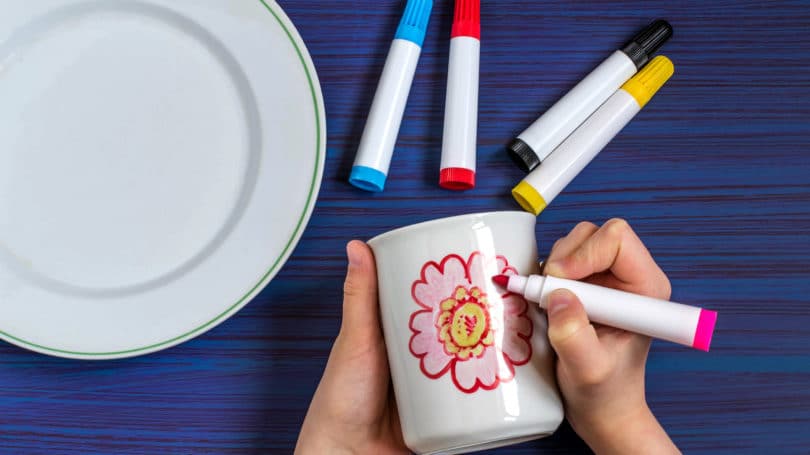
20. A Hand-Decorated Mug or Insulated Tumbler
Hand-decorated ceramic or insulated mugs are an especially thoughtful gift for avid coffee or tea drinkers.
To decorate an inexpensive white ceramic mug, use oil-based paint markers — regular permanent markers rub off over time. Just clean it thoroughly with rubbing alcohol, then draw your designs. But be careful not to touch the surface of the mug. Oil from your fingers may prevent the paint from adhering properly, so hold the mug with your hand on the inside. When you’re finished decorating, allow it to dry, and then bake it to set the paint. After baking, you can safely wash it, and the paint won’t rub off.
Get the full instructions and extra tips on Jennifer Maker.
Or make a pretty marbled mug by filling a tub with water, pouring multiple nail polish colors onto the water’s surface, and dipping the mug. After it dries, protect your design with a layer of dishwasher-safe Mod Podge.
Get the full instructions on Wildflowers and Wanderlust.
For recipients who like their beverages on the go, paint an insulated tumbler, which is handy for keeping drinks hot or cold for hours. Start with a plain stainless steel insulated tumbler. Use painter’s tape to mark off the top and bottom to create a band in the middle you can decorate. Then brush on chalk paint in your color of choice. Once it dries, decorate with vinyl letter stickers or other cutouts. Then finish with several coats of dishwasher-safe Mod Podge.
Get the full instructions on Leap of Faith Crafting. The blog also has a tutorial for blocking out your letters or designs with stencils made of vinyl or stickers and then spray-painting the mug.
21. Coasters
It can be tough to find store-bought gifts that reflect your recipients’ interests. But a craft like handmade coasters lets you uniquely tailor your gift. The image you put on a coaster can be anything — from album covers to the pictures you took on a memorable trip. You can make them all identical or use different images following a theme, such as nature, Pac-Man, or a sports team.
Supplies
Directions
- Use the scissors or X-acto knife to cut the images to fit your ceramic tiles.
- Using the foam brush, paint the surface of your tiles with the Mod Podge. Lay your image face up on the tile, and smooth out any wrinkles or air bubbles. Let it dry for 30 minutes.
- Paint over the top of the image with more Mod Podge. Let it dry for 1 hour. Repeat 2 or 3 more times with the Mod Podge, and then let it dry for at least 24 more hours.
- Affix a cork square to the back.
22. Kitchen Towels
For anyone who enjoys cooking and baking, homemade kitchen towels are both useful and sentimental. If a little one is making these for a relative, make a keepsake set of handprint towels perfect for Christmas. Start by coating the child’s hand in green fabric paint. Stamp three handprints in a triangle (to look like a Christmas tree) on a white cotton dish towel. Then freehand ornaments in various fabric paint colors, and use a free printable stencil to make a star atop the tree. Finish by heat-setting the paint with an iron.
Get the full instructions on It’s Always Autumn.
Or make a Scandanavian-inspired Christmas tree pattern using a carved potato as a stamp. Cut a potato in half lengthwise, and use a Christmas tree-shaped cookie cutter to carve out a raised tree for the stamp. Press the potato in a fabric paint color of your choice (the tutorial uses black) and stamp trees in a pattern all over the towel.
Get the full instructions on Better Homes & Gardens.
23. Decorated Wooden Spoons
Decorated wooden spoons are another practical DIY for the kitchen. Make some by using Mod Podge to affix pretty fabric to the handles of a set of spoons, like they did at Alice & Lois. Or paint the handles of wooden spoons and use a gold leafing pen to embellish them with elegant geometric designs, as shown on Melodrama.
24. Ornaments
Parents and grandparents appreciate homemade ornaments, especially those made by little ones. They become cherished keepsakes they can reminisce over year after year as the tree gets decorated. Handprint and thumbprint ornaments are an easy craft for younger children. They involve having kids make fingerprint or handprint impressions in clay or dipping kids’ fingers or hands into paint and pressing them onto Christmas bulbs to make winter- or holiday-themed designs.
For example, kids can make a thumbprint reindeer by pressing a thumb covered in brown paint onto an ornament. Once dry, use a permanent marker to draw eyes and antlers and a dab of red craft paint to make a Rudolph nose.
Get the full instructions on Little Bit Funky.
Or use a cookie cutter to cut a star from oven-bake clay. Press the child’s thumb into the center of the star to make a print, and then use letter stamps to press in their initials. (I suggest also adding the date.) Use a skewer to make a hole in the star’s top for hanging, and bake it according to the package directions. Once it’s cool, use a dark-colored crayon to highlight the fingerprint ridges and a pen to fill in the stamped initials.
Get the full instructions on Infarrantly Creative.
Older kids or more experienced crafters can hand-paint glass globes. Freehand a holiday design using acrylic craft paint. Alternatively, make fun, sparkly glass ornaments by squeezing paint into an iridescent globe and splattering the outside with gold paint, as shown on A Kailo Chic Life. Or bedazzle a solid-color ornament in patterns like starbursts or bands using self-adhesive gems, like they did on Good Housekeeping.
25. Decoupage Letters
Decoupaging large three-dimensional letters with images is a fun way to decorate any space. You can use anything that speaks to the recipient’s interests or style — from comic book panels or cherished photographs to pretty patterned paper or paint chips.
For this project, you need wooden letters to spell out a word or phrase, such as the recipient’s name or words like “love,” “peace,” or “dream.” Then gather your printed images and some Mod Podge. Use Mod Podge to layer small images over the letters in a collage effect or trace each letter onto a single large image (like wrapping paper), cut it out, and glue the single sheet to the face of the letter with Mod Podge. Then brush over the whole thing with another layer or two of Mod Podge to seal it.
Get the full instructions on Mod Podge Rocks.
26. A Lap Desk
Lap desks are handy for watching movies, surfing the Internet, casually shopping, or even to create an alternative workspace — anything you can do with a laptop from bed or the couch. They make thoughtful gifts for kids, college students, and even remote workers. And opting for a homemade one means you can style it with a fabric you know will appeal to the recipient. Plus, they’re inexpensive and easy to make — no sewing required.
Start with a wooden lap desktop. Then cut a piece of foam to the same size. Set the foam on the bottom side of the desktop. Then lay a piece of fabric large enough to cover the foam (about one-half yard) over it. Use a staple gun to staple the fabric around the foam and onto the desktop, tucking the fabric under as you go. Trim away any excess fabric. Finish by hot-gluing rope trim around the edges where the fabric-covered foam meets the desktop to hide your fabric edges and staples.
Get the full instructions on A Beautiful Mess.
27. A Journal
A handmade journal is a beautiful place to jot down daily tasks, track the household budget, or keep the grocery list. It’s also an ideal gift for anyone who loves to write. Make color-block notebooks by cutting adhesive vinyl and laying it over a complementary colored blank notebook, leaving the bottom half its original color. Then use a rub-on gold foil kit to add fun words, phrases, or designs.
Get the full instructions on Tell Love and Party.
You can also decoupage a custom notebook cover. Use Mod Podge to cover a notebook with photographs or decorative paper. Just choose your paper and trim it to size. Then brush a layer of Mod Podge on your notebook, and press down your paper. Finish it by brushing it with another layer of Mod Podge.
Get the full instructions on Happy Go Lucky. She uses comic book panels to decorate hers, so you really can use any kind of paper you like.
Homemade New-Parent Gifts
Little ones are often happier with the box than whatever’s inside it. But a new mom or new dad will be thrilled with a homemade toy for a baby or toddler, especially one that lets them interact with their child or watch as they discover new sensations or figure out how things work. They help keep little ones entertained or contribute to them reaching developmental milestones. Plus, gifts made with love and care make the best keepsakes.
The best baby and toddler gifts for new parents — homemade or otherwise — give plenty of opportunities for exploring, just like a gift box. Things they can tug on, stare at with wonder, and safely put in their mouths let parents entertain, stimulate, and — best of all — quiet their little ones.
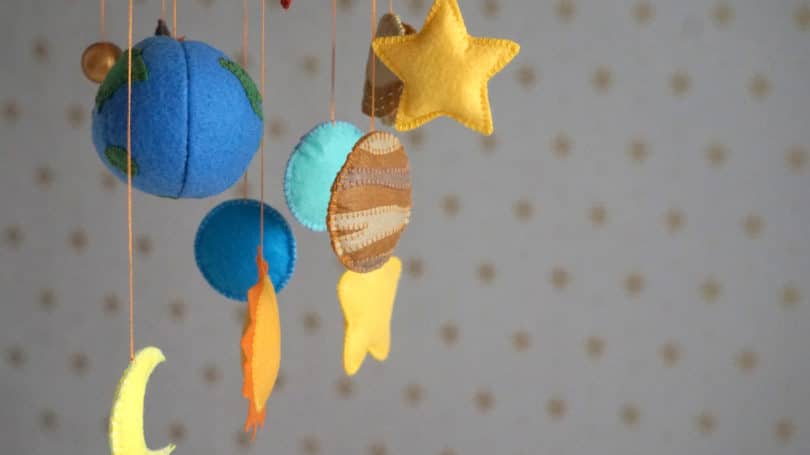
28. A High-Contrast Baby Mobile
According to the American Optometric Association, babies aren’t born with a full range of vision. They learn to see over time, gradually learning how to focus their eyes, use them together, and even discern color. In fact, babies don’t see color until they’re about 5 months old. Until then, experts believe imagery that pairs high-contrast colors like black and white helps babies learn how to use their eyes. So a high-contrast mobile that hangs overhead while Baby is lying on their back acts as a source of stimulation and entertainment and a vital developmental tool.
If you have a sewing machine, cut patterns like wavy lines, dots, and squares from black and white felt and sew them onto squares of the opposite color. Then string them from an embroidery hoop so they can hang down as a mobile.
Get the full instructions on Peek-a-Boo Pages.
If you don’t have a machine or sewing experience, you can still make a gift-worthy high-contrast mobile. Print high-contrast images on heavyweight card stock. Then glue those onto squares of cardboard. Use a thick needle or awl to poke holes through the squares and string a ribbon through. Then hang them from a wooden baby gym frame or use the embroidery hoop technique from the sewing version.
Get the full instructions, including the template, on The Artisan Life.
29. A Glitter Bottle Snow Globe
From the moment they enter the world, babies are constantly taking in everything around them. Gifts that focus on babies’ sensory development — sight, sound, touch, taste, and smell — help them experience and process the world, thereby growing their mental connections.
Sensory bottles are filled with interesting things for babies and toddlers to look at. Parents can shake or tip the bottles as their child stares mesmerized at beads or confetti falling in slow motion, suspended in solutions of baby oil or transparent hair gel.
The key to turning these into beautiful gifts is to start with the right bottle. Use clear plastic for safety, and look for one with a long, cylindrical shape and tightly fitting cap, like the bottles for Voss water.
Then choose a liquid or gel that’s either clear to show off your objects or a transparent sparkly color that’s fun to look at. It should be denser than water so the objects fall slowly. And finally, fill the bottle with tiny objects of different colors, shapes, and sizes. Go with Snowman and Snowflake confetti or tiny plastic Christmas shapes for a festive vibe. But be sure to glue on the bottle top so the baby doesn’t open it by accident.
For inspiration and instructions, visit My Bored Toddler.
30. A Ribbon-Pull Toy
You already know babies and toddlers love playing with boxes, so instead of trying to find a gift that’s more interesting than a box, make the box the toy. A ribbon-pull toy keeps little ones endlessly fascinated, and you make it with a recycled box or oatmeal container, some pretty paper, and some lengths of ribbon in different colors, textures, and widths.
First, cut ribbons in lengths several inches longer than the width of your container. Then cover the container with decorative paper. Next, poke two holes in the container’s sides for every piece of ribbon.
Put a knot large enough not to pull through the holes in one end of each ribbon, and then push the unknotted end of one ribbon into one hole and pull it out another. Tie a knot in the end you just pulled through, making sure to leave several inches of room for the ribbon to pull back and forth. Then repeat with as many lengths of ribbon as you have. As they tug on the ribbons of this toy, little ones can watch as their lengths get longer and shorter.
Find the full instructions on The Imagination Tree.
31. A Toddler Busy Board
Busy boards occupy toddlers’ hands with interesting things to slide, latch, zip, stick, and unstick. They give toddlers tons of things to investigate and explore. Plus, they help develop toddlers’ fine motor skills, especially the fine muscles in the hands.
To make one, glue or screw any combination of zippers, latches, doors, switches, and textured fabrics to a wooden board.
Get inspiration for making and designing your own toddler busy board on Hands on as We Grow.
32. Homemade Building Blocks
Building blocks help both babies and toddlers work on fine motor skills as they practice grasping and piling them. If you have a sewing machine, make baby-safe blocks by sewing fabric covers to go over craft foam cubes. Simply sew together squares cut from scrap fabric measured to fit the sides of the blocks.
Get the full instructions on Wren Handmade.
For a new-sew option, decoupage wooden cubes with numbers, letters, or squares of patterned paper. Just brush the surface of your blocks with Mod Podge, press on your cutouts, and brush again over the top surface to seal.
Get the full instructions on Bit & Bauble.
You can also paint nice-looking wooden blocks, even if you have no artistic talent. Use number or letter stickers as stencils. Press them onto the blocks, and then paint over them with acrylic craft paint. Once dry, peel up the stickers and coat the blocks with a toy-safe varnish. Note that toy-safe varnishes are nontoxic, but they’re not food-grade. Don’t let a teething baby chew on the blocks.
Get the full instructions on Pure Sweet Joy.
Homemade Toy & Activity Gifts
It’s possible to DIY some really fun toys. These make great gifts for kids, but they also work well for family gifts. Things like game sets and activity kits are the beginnings of a family night filled with laughter and good times.
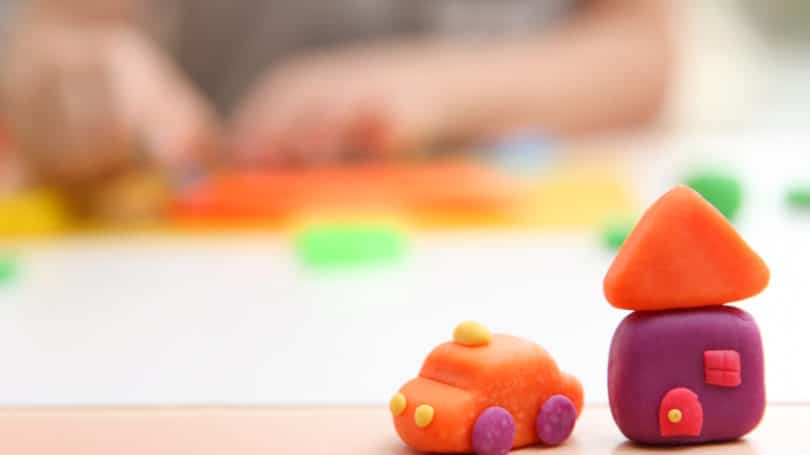
33. Taste-Safe Scented Play Dough
Play dough is fun for all ages. And though it’s relatively inexpensive to buy, a homemade taste-safe play dough means families with babies or toddlers can also play together. Make a simple batch using flour, salt, and canola oil. And color it with flavored drink mix. Not only will you get some vibrant colors, it will also smell amazing.
Get the full instructions on Surviving a Teacher’s Salary.
34. A Plastic Bottle Bowling Set
Plastic drink bottles of any size — 16-ounce water bottles or 1- or 2-liter soda bottles — make excellent bowling pins. And using them for this craft lets you upcycle something otherwise destined for a landfill.
Supplies
- 10 same-size plastic bottles
- An adhesive remover, such as Goo Gone
- Acrylic craft paint in various colors
- Sand
- E6000 super glue
- A small plastic or rubber ball
Directions
- Remove the labels from the bottles. Use an adhesive remover according to package directions to take off any lingering adhesive residue.
- Paint the bottles in various bright colors by pouring a dollop of paint inside each bottle and gently swirling the paint around until the inside is completely covered. Add more paint as necessary to cover the bottle. If you put the lid back on the bottle to swirl, take it off. Let the paint fully dry overnight.
- Add a small amount of sand to the bottom of each bottle — just enough to make them stable, but not so much a rolled ball can’t knock them over. Then put a drop of super glue on the threads of the bottle cap, and screw the cap onto each bottle. Let it dry 1 to 2 minutes.
- Package the gift with a store-bought rubber or plastic ball.
Note: Avoid foam balls if you’re making this gift for a family with little kids, as babies and toddlers like to put things in their mouths and could bite off a chunk of foam, causing a choking hazard.
35. A DIY Science Kit
A science kit full of fun experiments and supplies provides the ultimate combination of learning and fun. It’s a DIY project kids and grown-ups can enjoy together. Plus, it’s an easy answer to cries of “I’m bored!” during winter break. And it’s a totally manageable last-minute gift. Just fill a plastic tub with items you can find at the grocery store or on Amazon — or even around the house — like baking soda, vinegar, and Skittles. And then package it with a printed binder or booklet of fun experiments to try.
A few science experiments and their necessary ingredients include:
- Indoor Snow. They’ll only need a couple of ingredients for this activity: baking soda and cornstarch. Mixing them with a small amount of water creates a moldable concoction similar to snow. Get the full instructions on Little Bins for Little Hands.
- Crystal Snowflakes. They’ll need pipe cleaners, borax, and transparent nylon cord along with a few wide-mouth containers, like Mason jars or juice glasses. After shaping the pipe cleaners into snowflakes, they let them sit in a solution of borax overnight. The next day, the borax has created crystals on the pipe cleaners so they look like real snowflakes. Get the full instructions on Go Science Kids.
- Snow Volcano. They’ll need baking soda, vinegar, dish soap, red food coloring, and a narrow plastic container, such as a measuring cylinder (to hold the volcano solution). On a snowy day, they can head outside to build snow volcanoes that really erupt. Get the full instructions on Science Sparks.
- Soda Bottle Rockets. They’ll need an empty 2-liter soda bottle, baking soda, vinegar, pencils, a wine bottle cork, a paper towel, and some duct tape. After building their rocket, they can head outside to add their homemade rocket fuel and watch it soar. Get the full instructions on Frugal Fun For Boys and Girls.
- Slime. They’ll need a bottle of school glue, saline solution (such as for contact lenses), and baking soda. Once they mix it, they’ll have hours of slimy fun. Get the full instructions on Little Bins for Little Hands.
Find even more ideas for putting together a DIY science kit on Little Bins for Little Hands.
36. A Build-Your-Own Fort Kit
Remember building forts in the living room with bedsheets and sofa pillows when you were a kid? Fort-making is a timeless tradition that never goes out of style. And it’s beloved by all ages. A DIY fort is just the thing for a family campout in the living room or even a fun tween or teen sleepover.
Put together a DIY kit the whole family will enjoy by filling it with fort-making supplies, including:
Bundle them together in a drawstring bag or backpack. For a special touch, personalize the bag with their name or the words “Fort-Making Kit.” And if you’re skilled with sewing, you can applique a design on the front.
37. Glove Monsters
Upcycle old or inexpensive knit gloves into a new stuffed animal friend for the kids on your list. These easy-sew monsters are adorable, and they’re doable even without a sewing machine. Sew the top of the glove closed in a U shape, leaving a hole for stuffing. Stuff it with fiberfill, and stitch the glove closed. Use buttons or felt circles to make eyes and felt to make a mouth. Hand-stitch these onto the front to make a monster face.
Get the full instructions on Craftaholics Anonymous.
Caution: Don’t use buttons for kids under 3. They could come loose and cause a choking hazard.
Alternatively, turn this craft into a squeezable “stress monster,” which makes the perfect gift for a college student or co-worker. Follow the same sewing instructions, but instead of using fiberfill, cut up some inexpensive makeup sponges and pack the monster full of the shredded foam to give it a spongy, squishy feel.
38. A Lego Table With Storage
If you have Lego enthusiasts on your list, give them a place to store their toys and let their imaginations run wild. This project is a simple hack of an inexpensive Ikea table — so no carpentry skills required.
You’ll need to purchase an Ikea Lack table, a Trofast bin, some drawer slides, four 10-inch-by-10-inch building block base plates, Gorilla tape, and super glue. Attach the drawer slides to the underside of the table with the Gorilla tape, glue the base plates to the top of the table, and you’re done.
Get the full instructions on The Handyman’s Daughter. These instructions are for a kids table, but you can make a similar table for taller Lego lovers by choosing a size-appropriate table and bins.
39. An Oversize Game
Oversize versions of popular indoor games people can play in the backyard are fun for all ages. There’s something about throwing around giant dice or attempting to spell words with Scrabble mega-tiles that makes a classic game that much more fun, especially on Christmas morning.
Jenga is easy to convert to a giant size without any kind of advanced carpentry skills or power tools. You need to cut two-by-fours into smaller game-size pieces. But if you don’t own a power saw, most big-box hardware stores will cut the wood for you. For example, according to design blogger Kelly Ballard of City Girl Meets Farm Boy, Home Depot typically does 12 cuts for free, and then charges a nominal fee for the remainder. That said, policies may vary from one store to another. And even though it’s helpful to use an electric sander to buff the edges, you can do it the old-fashioned way with sandpaper and elbow grease.
Get the full instructions on Squirrelly Minds.
And if you live in a climate where it’s cold in the winter and would rather give something they can play with right away, opt for giant checkers. This project involves painting cork coasters red and black and making an oversize game board by painting a vinyl tablecloth.
Get the full instructions on Project Nursery.
Final Word
If you’re stuck trying to figure out the right present ideas for everyone on your list, don’t overlook these DIY Christmas gift ideas. Nothing says you care quite like putting effort into making something.
They’re also perfect for last-minute gifts or gifts for that one person you know who has everything. You can do many of these projects in a matter of minutes with tools and products you already have or can easily pick up from the grocery store or on Amazon. It makes them a reliable backup for all the people — friends, co-workers, relatives, and surprise guests — who gave you gifts you weren’t expecting. You can also make them for neighbors or to go along with gift cards as a fun family Christmas craft.
Published at Sat, 19 Dec 2020 00:45:13 +0000


Comments
Loading…