
8 Make-Ahead Freezer Meal Recipes for Healthy Food Storage
Every parent wants their family to eat healthily. The tricky part is making that happen — preferably on a budget — amid all the other chores and obligations competing for their time and attention.
Options abound for parents serious about preparing nutritious, tasty meals at a reasonable cost. But while many healthful family meals are easy enough to prepare on the cheap, the most interesting meals often seem to require significant time commitments. Even people who truly love to cook don’t always have the luxury of spending an hour in the kitchen after a long day at work.
That’s where make-ahead freezer meals come in. The freezer meal solves perhaps the most vexing challenge for weeknight cooks: creating innovative meals when time and energy are short. As someone who’s put together countless freezer meals over the years, I can attest to their utility — and with the right touch, their tastiness too.
Cheap, Healthy Freezer Meal Ideas & Recipes
These are among the tastiest, healthiest, most affordable meal recipes I’ve made to date. For each meal, the prices indicated reflect approximate pricing, drawn either from my own experience or from prevailing supermarket prices in my area and rounded to the nearest $0.25 where possible (and to the nearest $0.10 when ingredient totals fall under $1). Your actual costs will vary by region, season, and vendor, among other factors. Also note these recipes don’t include pricing for ingredients home cooks tend to keep on hand and don’t individually add significantly to the total cost, such as spices and water.
The pricing you see here reflects efforts to prioritize low cost over high ingredient quality. Unless otherwise noted, all items are nonorganic, and canned products are generics or bottom-shelf brands. If you want to replicate these meals with high-quality or organic ingredients, expect to pay a good deal more.
You can scale these recipes, so feel free to manipulate them for larger serving sizes or larger families. And when you label them, remember to mark the recipe name, prep date, and special dietary notes so you don’t consume your meals out of order. For more fantastic tips for making this work for your family, see our tips for make-ahead freezer meals.
Pro tip: If you struggle to put freezer meal plans together each month, there are services that can help. MyFreezEasy will give you meal plans and show you how to successfully cut meal prep time and cost.
1. Gluten-Free Red Beans & Rice With Chicken
This recipe mixes tasty pulled chicken morsels with juicy red beans against a puffy backdrop of al dente wild rice. It’s thicker than most stews but thinner than stovetop chicken and rice.
You can make this dish vegetarian with more rice, tomatoes, and beans, though you might want to toss in other veggies or extra-firm tofu for texture. If you follow this recipe exactly, it’s gluten-free.
Total Approximate Cost: $29.50 per batch, $7.50 per meal, $1.50 per serving
Serves: 16 in 4 (1-quart or larger) deli containers
Prep Time: 5 minutes | Inactive Time: 12 – 16 hours | Cook Time: 4 – 8 hours | Total Time: 16 – 20 hours
Ingredients
For freezer meal prep
- 1 1/2 pounds small dry red beans = $3
- Water (for soaking the beans)
- 4 pounds boneless, skinless chicken breast = $14
- 1 pound wild rice = $8
- 2 (28-ounce) cans diced tomatoes, drained = $3
For cook day
- 2 cups chicken or vegetable stock = $1 (or 2 cups water and 4 cubes chicken or vegetable bouillon = $0.50)
- 1/4 teaspoon salt (optional)
- 1/2 teaspoon black pepper (optional)
- 1 – 2 teaspoons cayenne pepper (optional)
- 1/4 teaspoon soy sauce (for umami flavor, optional)
- 1/4 teaspoon Worcestershire sauce (for umami flavor, optional)
- 1 teaspoon cumin (optional)
- Other spices as desired (optional)
Directions
- In a colander, wash the beans, removing any pieces of rock and debris. Put them in a large bowl, cover them with water, and set them out to soak overnight, either on your counter or in the fridge.
- On prep day, place a colander in the sink and pour the beans in to drain them thoroughly. Wash them to remove any buildup, and set them aside.
- Drop the chicken breasts into the deli containers, making sure each gets a roughly equal amount of chicken. A pound of chicken breast usually works out to about four individual breasts, so four per container is a reliable rule of thumb. However, you can cut up larger breasts to achieve an even split.
- Pour 4 ounces of wild rice and 6 ounces of soaked beans around the breasts, holding the breasts upright to mix grains and legumes evenly.
- Seal each deli container, label it (making sure to make it clear it goes with the bag in Step 6), and put it in the freezer.
- Add 14 ounces (half a 28-ounce can) of diced tomatoes to 4 quart-size zip-close bags. Label each bag so it’s clear which meal they go with, seal upright, and lay flat to freeze.
- On the evening before cook day, remove a tomato bag and a chicken-and-rice bag from the freezer to defrost in the refrigerator. Let them sit overnight.
- On cook day, empty the defrosted contents of each bag into the crock of a 2-quart or larger slow cooker. Add the chicken or vegetable stock (or water and bouillon cube). Add the salt, black pepper, cayenne pepper, soy sauce, Worcestershire sauce, cumin, and other spices as desired. Stir everything together thoroughly. If you’ll be gone for longer than 8 hours, add another 1/4 cup of water or stock and stir again before leaving. (Your rice will be puffier, but the dish won’t dry out.)
- Turn the slow cooker’s heat to low. Cook for 8 hours or until the rice is puffy and slightly al dente.
- Before serving, use two forks to shred the chicken, which should yield effortlessly, and mix well.
Serving Suggestions
Consider serving your red beans and rice with these optional sides and toppings.
- Bread. Sliced or whole-loaf bread is a straightforward complement to this hearty dish. Though the rice really adds bulk and soaks up most excess liquid, bread is still useful for dipping (or as an alternative to a fork). Butter and olive oil optional.
- Cheese. Finely shredded or grated Parmesan, Romano, or Asiago is a fantastic topping. If you’re also serving bread, shredded or grated cheddar pairs well.
- Asparagus or Other Side Veggie. For a healthier side, toss fresh asparagus with salt, olive oil, and pepper and saute, roast or microwave during the last 10 to 20 minutes of cooking the red beans and rice.
2. Stuffed Poblano Peppers
This light, flavorful dish is easy to make even lighter — just replace the ground sirloin with your preferred mushroom variety at a 1-to-1 ratio. But set aside ample time on prep day. Of all the weeknight-friendly freezer meals here, this one requires the most effort upfront. On the bright side, meal day is a breeze, and you won’t need to break out the slow cooker.
Adapted from MyRecipes
Total Approximate Cost: $18 per batch, $9 per meal, $2.25 per serving
Serves: 8 in 2 (8-inch-by-8-inch) casserole dishes
Prep Time: 40 minutes | Inactive Time: 12 – 16 hours | Cook Time: 20 minutes | Total Time: 13 – 17 hours
Ingredients
For freezer meal prep
- 8 large poblano peppers = $3.50
- 2 cups water
- 1 ounce dried ancho chiles (approximately 2 chiles) = $0.60
- 2 tablespoons vegetable oil
- 1 large onion, diced (about 3 cups) = $1
- 10 garlic cloves, minced = $0.50
- 1 teaspoon salt, divided
- 1 teaspoon pepper, divided
- 12 ounces 90/10 ground sirloin = $4.50
- 4 ounces (half a block) reduced-fat cream cheese = $1
- 1 cup brown rice, cooked according to package directions = $0.50
- 3/4 cups queso fresco = $1.50
- 1 (28-ounce) can diced tomatoes, drained = $1.50
- Juice of 2 limes (about 1/4 cup) = $1.50
- 2 teaspoons sugar
- 1 teaspoon ground cumin
- Cooking spray
For cook day
- 1/4 cup chopped cilantro leaves = $0.30
- 3/4 cups queso fresco = $1.50
Directions
- On prep day, position the top rack so that the top of the casserole dish will be about 3 inches from the heat source and preheat your oven’s broiler to high. Line a baking sheet with foil. Place the poblanos on the prepared baking sheet and broil for 12 minutes, or until blackened, turning halfway through. Place the blackened poblanos in a paper or zip-close bag and close tightly to steam them, making it easier to peel off the skins. Let them sit for 15 minutes.
- Meanwhile, in a medium saucepan over high heat, boil the water. Place the ancho chiles in a bowl, and cover them with the boiling water, allowing them to rehydrate for 10 minutes before draining.
- Remove the poblanos from the bag, peel the skins, and then cut a lengthwise slit in each one and discard seeds and inner membrane. Set the poblanos aside.
- Preheat the oven to 400 degrees F. While the oven’s coming to temperature, heat a large skillet over medium heat. Add the oil, swirl to coat, and heat until water droplets pop when tossed onto the oil’s surface.
- Add the onions to the skillet. Cook for 2 to 3 minutes, stirring occasionally, or until tender. Add the garlic and cook for another 60 to 90 seconds. Remove half the mixture from the skillet and reserve it for the sauce.
- To make the beef filling, add 1/2 teaspoon of salt, the pepper, and the beef to the onions and garlic in the skillet. Cook for 8 minutes, or until the beef is done, using the edge of your spoon or a potato masher to break it up into small chunks. Add the cream cheese, and stir until well mixed. Stir in the cooked rice and queso fresco. Remove the beef filling from the heat and set aside.
- To the jar of a quart-size blender, add the ancho chiles, reserved onions and garlic, tomatoes, lime juice, sugar, cumin, and the remaining 1/2 teaspoon of salt. Use the highest speed setting to blend into a smooth tomato sauce.
- Coat 2 (8-inch-by-8-inch) glass or ceramic baking dishes with cooking spray. Pour 1 cup of tomato sauce into each.
- Open each poblano and use your fingers to flatten it slightly. Divide the beef filling evenly between them, filling each pepper to the brim. Place 4 peppers in each dish, and top with the remaining sauce and queso fresco.
- Cover the dishes with heavy-duty aluminum foil. Label and freeze them.
- On the evening before cook day, place one or both dishes into the refrigerator to defrost.
- On cook day, remove the foil and cover tightly with plastic wrap. Using a sharp knife or fork, poke 4 or 5 holes in the wrap.
- If you’re cooking both dishes simultaneously, microwave on high for 14 to 15 minutes or until piping hot. If you’re cooking one, microwave on high for 8 to 9 minutes or until piping hot. Carefully remove the dish or dishes from the microwave and allow them to cool slightly before topping with the cilantro and queso fresco.
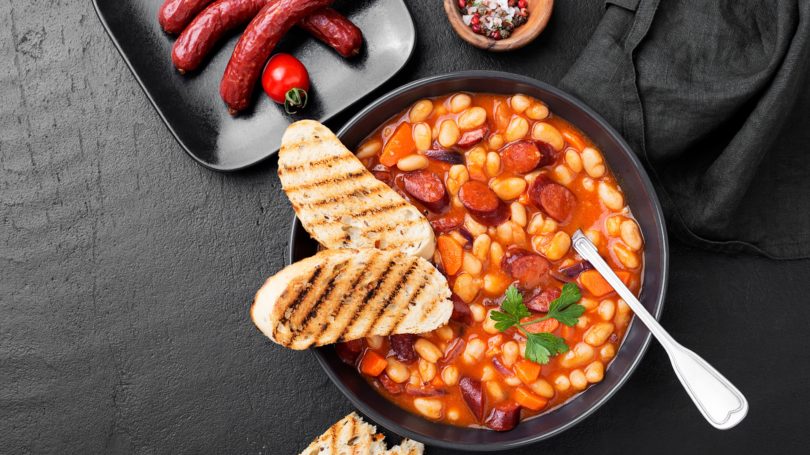
3. Sausage & White Bean Soup
This creation is easy to customize and pairs perfectly with the suggested sides. If you’re vegetarian, you can substitute a grain or soy-based vegetable or vegan sausage in place of meat sausage. If you’re gluten-sensitive, use certified gluten-free sausage — regular sausage can have traces of gluten in the casing.
Total Approximate Cost: $33 per batch, $8.25 per meal; $2.25 per serving
Serves: 16 in 4 (2-quart) containers
Total Time: 4 hours, 5 minutes – 8 hours, 10 minutes | Prep Time: 5 – 10 minutes | Cook Time: 4 – 8 hours
Ingredients
For freezer meal prep
- 4 pounds dry cannellini beans (white beans) = $10
- 1 pound celery, chopped into small half-moons = $1
- 1 pound carrots, diced = $1
- 4 pounds medium-hot Italian sausage = $18
- 2 (28-ounce) cans diced tomatoes, drained = $3
For cook day
- 2 cups water
- 1/4 teaspoon salt (optional)
- 1/2 teaspoon black pepper (optional)
- 1 – 2 teaspoons cayenne pepper (optional)
- Other spices as desired (optional)
- 1/2 teaspoon soy sauce (for umami flavor, optional)
- 1/2 teaspoon Worcestershire sauce (for umami flavor, optional)
Directions
- In a colander, wash the beans, removing any pieces of rock and debris. Put them in a large bowl, cover them with water, and set them out to soak overnight, either on your counter or in the fridge.
- On prep day, place a colander in the sink and pour the beans in to drain them thoroughly, wash them to remove any buildup, and set them aside.
- Add the celery, carrots, sausage, and white beans to 4 (2-quart or larger) deli containers.
- Add 14 ounces (half a can) of diced tomatoes to 4 resealable plastic bags. Label the bags, making it clear which containers they pair with, seal upright, and lay flat to freeze. Likewise, label each deli container so it’s clear which bag it goes with and freeze them.
- On cook day, empty the contents of one deli container and one bag into the crock of a slow cooker, set it to low, and add the water. Add an additional 1/2 cup water if you plan to cook for longer than 8 hours or if you prefer thinner soup.
- Season with salt, pepper, cayenne pepper, and other spices (if desired). Note that the sausage likely already contains salt and spices, so if you’re using a brand you’re not familiar with, go light on the seasoning upfront. You can add more toward the end of the cooking process. Savory flavorings such as soy and Worcestershire sauces can complement this dish nicely as well.
Serving Suggestions
Consider serving your sausage and white bean soup with these sides:
- Rice. White or brown rice is a natural fit here, either as a side or mixed into the soup during cooking. For separate rice sides, begin cooking your rice 20 to 25 minutes before your slow cooker is set to finish.
- Bread. In the absence of rice, this dish begs for bread for dipping.
- Cheese. Whether you choose rice or bread, you can top it with grated Parmesan, Romano, or Asiago.
4. Gluten-Free Beef Fajitas
Though it requires more prep time upfront than some of the other meals on this list, this twist on traditional beef fajitas is worth the effort. You can easily make this upscale meal without leaving yourself much lighter in the wallet. And doesn’t require a messy marination step.
Meat quality matters in this dish, and stovetop preparation is definitely the preferred method. If you follow this recipe exactly and use corn tortillas in place of the usual flour tortillas, your meal will be gluten-free.
Total Approximate Cost: $38 per batch, $9.50 per meal, $2.50 per serving
Serves: 16 in 4 (1-quart) containers
Prep Time: 15 – 20 minutes | Cook Time: 15 – 25 minutes | Total Time: 30 – 45 minutes
Ingredients
For freezer meal prep
- 4 pounds flank steak, sliced into thin strips = $26
- 6 green peppers, sliced into thin strips = $6
- 2 red peppers, sliced into thin strips = $3.50
- 2 large yellow onions, sliced into thin strips = $2
For cook day
- 1/2 teaspoon salt (optional)
- 2 – 3 teaspoons cayenne pepper (optional)
- 1/2 teaspoon Worcestershire sauce
- 2 – 3 teaspoons paprika (optional)
- 1 – 2 teaspoons garlic powder (optional)
- 1 – 2 teaspoons cumin (optional)
- 4 corn tortillas (more if desired) = $0.30
Directions
- On prep day, divide the steak, peppers, and onions evenly between 4 (1-quart) deli containers. Label and freeze.
- Before cooking, defrost a deli container in the fridge overnight or during the workday.
- When thoroughly thawed, drain most of the excess liquid, leaving about a quarter of the volume for flavor and moisture.
- Preheat a cast-iron skillet or other large pan over medium-high heat. When it comes to temperature, add the container’s contents, the Worcestershire sauce, and (if desired) the paprika, garlic powder, and cumin. Cook, tossing periodically, until the steak is brown on the outside and the peppers and onions are softened slightly (about 4 to 6 minutes).
- Lower the heat to medium or medium-low, stirring periodically, and cook until at least medium-rare (the meat is dark pink on the inside and an instant-read thermometer reads 135 degrees F when inserted into the middle of the largest piece). The peppers should be soft and the onions translucent.
- Meanwhile, heat a second cast-iron skillet over medium heat. When it reaches temperature, place two corn tortillas in the pan. Heat for 30 to 45 seconds, then flip and heat the other side for 30 to 45 seconds. Remove and cover with a tea towel to keep them warm, then repeat with the other two tortillas. (For crispier tortillas, heat an additional 15 to 30 seconds per side.)
- Serve family-style, allowing each diner to fill their tortillas as they please.
Cooks Note: Pepper color is a matter of personal preference, but green peppers tend to be cheaper, so you can save even more by substituting green peppers for the red.
Serving Suggestions
Serve your beef fajitas with at least one of these sides or toppings. Chips, salsa, and sour cream require the least time to prepare.
- Rice. Chipotle’s famous cilantro-lime rice (recipe courtesy of Culinary Hill) is an excellent fajita side. Just remember to leave adequate time for cooking it on meal day.
- Refried Beans. Refried beans is another stalwart fajitas side. Budget time for this delicious recipe from Tastes Better From Scratch.
- Corn Chips and Dip. Crisp corn tortilla chips and your favorite dip complement beef fajitas nicely.
- Salsa or Pico de Gallo. Salsa or pico work as an alternative chip dip, a topping for the fajitas, or both. Pioneer Woman Ree Drummond’s pico de gallo recipe and Cookie + Kate’s food processor salsa are easy enough to make at home, but if you’re in a rush, your favorite store-bought brand is fine.
- Sour Cream. Sour cream is a creamy, cooling foil for fajita spices.
- Shredded Cheese. Shredded cheddar or mozzarella can also complement fajitas.
- Chopped Cilantro and Lime. Finely chopped cilantro and a squirt of lime juice make a great finishing touch atop your fajitas.
5. Gluten-Free Microwave Chicken & Veggies
My mom used to fall back on this one when she’d had a rough day at work. As a kid, I was so fascinated by the concept of cooking a whole chicken in the microwave, I didn’t stop to think about just how little work it requires. And prepared as is, it’s gluten-free — though your choice of sides may change that.
Basically, you’re cooking a whole chicken with frozen vegetable sides. With the basic recipe, there’s virtually no prep time, as everything comes in store packaging. If you’re using fresh veggies from a grocery store or community-supported agriculture garden, you may need a few minutes to put them in freezer-safe containers.
Total Approximate Cost: $10 per meal, $1.25 – $2.50 per serving
Serves: 4 – 8
Prep Time: 5 – 10 minutes | Cook Time: 30 – 60 minutes | Total Time: 35 – 65 minutes, depending on chicken size
Ingredients
- 1 (4-pound) whole frozen chicken = $8
- 1 pound mixed frozen vegetables = $1.50
- Salt
- Black pepper
- 1 – 2 teaspoons paprika (optional)
- 1 teaspoon cumin (optional)
- 1 – 2 teaspoons cayenne pepper (optional)
Directions
- The night before cook day, defrost chicken in the fridge.
- When the chicken is fully thawed, place it in a large microwave-safe bowl or casserole dish and sprinkle the outside and inside liberally with salt and pepper.
- Place it in the microwave and heat at approximately 70% power (ovens vary) for 10 minutes per pound. If you managed to get a 4-pound bird, that’s 40 minutes. But most grocery store chickens weigh less than 5 pounds. About halfway through, stop the microwave and use a baster or basting brush to cover the chicken’s surface with the collected juices (if any). Close the microwave door and continue cooking for 10 minutes.
- Using an instant-read or other meat thermometer inserted into the thickest part of the breast, check the chicken’s internal temperature. Continue cooking until the chicken registers a temperature of 165 degrees F. Remove the chicken from the microwave, and let it rest for 10 minutes.
- While the chicken is resting, place the frozen vegetables in a quart-size microwave-safe Pyrex container. Add salt, pepper, paprika, cayenne, and cumin. Cover and microwave the vegetables on high until steaming hot, about 5 to 8 minutes.
Serving Suggestions
Consider one or more of these sides. Mashed potatoes and gravy are a classic combo, but let your taste guide you.
- Rice. White or brown rice works well as a healthy side for many types of meat, including chicken. You can cook the rice while the chicken is in the microwave. If you’re using microwave rice, allow for an additional 10 to 15 minutes of cooking time.
- Mashed Potatoes. Unless you’re using the potato flakes, mashed potatoes are a more involved side, but it pairs perfectly with chicken. If you have ample time, mash your own red or russet potatoes with butter, milk or buttermilk, salt, and pepper (this Food Wishes recipe is an excellent, if not exactly healthy, choice). On busier nights, substitute instant mashed potatoes and see if the rest of the crew notices.
- Gravy. Many people can’t imagine mashed potatoes without gravy. But it also works well on poultry. High-quality store-bought chicken gravy works fine, though Food Wishes also has an excellent recipe for make-ahead gravy you can freeze for a quick addition to any meal. The recipe calls for turkey, but you can use an equal weight of chicken.
- Cornbread. If you have enough time to mix, bake, and cool cornbread from a boxed mix, cornbread is a nice complement to chicken.
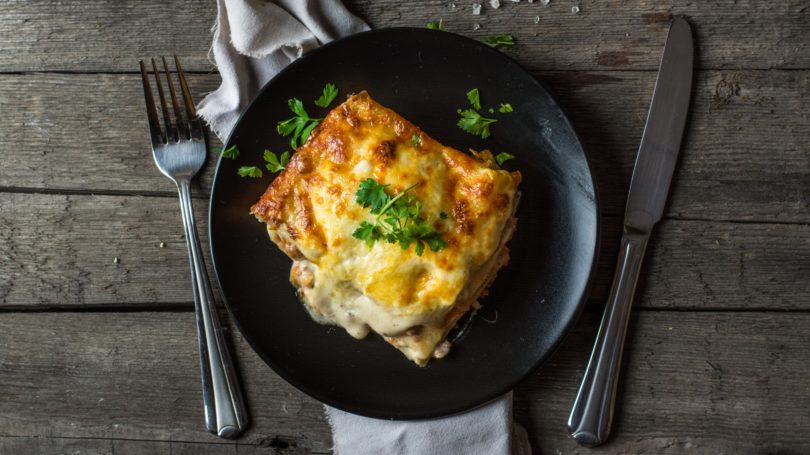
6. Ground Sausage Lasagna
Lasagna sounds like an ambitious project — and in some ways, it is. However, if you incorporate its admittedly laborious assembly process into a big freezer meal prep party, you’ll barely notice. This meal also takes longer to cook on cook day. Use the extra time to catch up on household chores, work emails, or family time.
Adapted from Must Have Mom
Total Approximate Cost: $21.50 per meal, $2.75 per serving
Serves: 8
Prep Time: 30 minutes | Cook Time: 60 minutes | Total Time: 90 minutes
Ingredients
- 1 pound ground sausage (sweet or Italian) = $4
- 1/2 cup chopped onion (approximately 1/2 small yellow onion) = $0.50
- 1 clove garlic, minced = $0.10
- 3 tablespoons chopped fresh parsley, divided = $0.20
- 1 tablespoon chopped fresh basil = $0.10
- 1 (14.5-ounce) can diced tomatoes = $1.50
- 1 (15-ounce) can tomato sauce = $2.50
- 1 (16-ounce) container cottage or ricotta cheese = $3.50
- 1/2 cup freshly grated Parmesan cheese, divided (plus more for serving) = $1.50
- 1 box (16 strips) lasagna noodles = $2
- 2 cups shredded mozzarella cheese = $5.50
- Salt to taste
Directions
- On prep day, bring a 12-inch skillet to medium heat. Add the sausage and chopped onion and cook, breaking up the sausage and stirring frequently. Continue cooking, stirring occasionally, until the sausage is browned but not cooked through and the onions are soft, about 8 minutes. Add the garlic and cook for another 1 to 2 minutes, or until the garlic is fragrant. Drain the excess sausage grease. Stir in 2/3 (2 tablespoons) of parsley, the basil, tomatoes, and tomato sauce. Bring the sauce to a boil, stirring occasionally.
- Meanwhile, in a separate medium bowl, mix the cottage cheese or ricotta, 1/4 cup of Parmesan, and the rest of the parsley to create the seasoned cheese filling.
- Spread half the sauce along the bottom of a 9-inch-by-13-inch aluminum (not glass) or reusable baking dish. Cover with a full layer of uncooked noodles. Spread half the seasoned cheese filling (about 1 cup) over the noodles, then sprinkle it with half the mozzarella cheese (1 cup). Add another layer of uncooked noodles, and top them with the remaining sauce. Add a final layer of uncooked noodles, and spread the rest of the seasoned cheese filling over them. Sprinkle the top with the rest of the mozzarella and Parmesan cheese.
- Wrap the pan tightly in plastic wrap, pushing down to give the lasagna room to expand when it freezes. Cover the pan with a plastic lid or layer of aluminum foil. Label and freeze it.
- On the night before cook day, thaw the pan in the fridge.
- On cook day, preheat the oven to 350 degrees F. Cook covered for 45 minutes, then uncover and cook for another 15 minutes, or until the top layer of cheese bubbles freely.
- Top with more Parmesan if desired.
Serving Suggestions
To recreate the Italian restaurant vibe, serve one or more of the following sides with your lasagna.
- Italian Loaf. What goes better with meaty, saucy lasagna than a hunk of Italian bread? Have yours plain or with a side dip of olive oil spiked with flavors like freshly cracked pepper, balsamic vinegar, grated Parmesan, and Italian spices.
- Garlic Bread. As bread sides go, this one does require some labor, but the end product is worth it. Try this garlic bread recipe from Delish.
- Cooked Vegetables. Add some fiber with boiled or oven-cooked vegetables: asparagus, broccoli, and cauliflower are good choices.
- Green Salad. Toss together some chopped fresh lettuce, onions, peppers, and carrots, then dress it with oil and vinegar for a lighter, fresher side option.
7. Freezer-Friendly Vegan Tofu Stir-Fry
This recipe is a freezer-friendly, lower-prep take on The Minimalist Baker’s veggie-tofu stir-fry. Budget at least 30 minutes of active time on prep day, but once that’s set, you’ve got yourself a tasty, affordable vegan meal that reheats beautifully in the microwave.
Adapted from The Minimalist Baker
Total Approximate Cost: $9 per batch and meal, $2.25 per serving
Serves: 4 servings in 2 (1-quart or larger) deli containers
Prep Time: 20 – 30 minutes | Inactive Time: 15 – 20 minutes | Cook Time: 10 – 15 minutes | Total Time: 45 – 65 minutes
Ingredients
- 2 (14-ounce) blocks extra-firm tofu = $4
- 1/2 cup soy sauce = $0.50
- 4 tablespoons brown sugar = $0.30
- 2 tablespoons maple syrup = $0.50
- 2 tablespoons fresh ginger, grated = $0.20
- 2 tablespoons cornstarch = $0.30
- 4 tablespoons sesame oil = $1
- 2 cups (approximately 1/2 pound) carrots, chopped = $0.50
- 3 cups (approximately 1 pound) green beans, roughly chopped = $1.50
Directions
- On prep day, slice open the tofu packages and drain the liquid. Remove the blocks from the package and place between 2 double-folded paper towels. Place a flat plate on top of the tofu and weigh it down with a heavy object (such as an aluminum can). Let it sit for 15 minutes, or until dry, changing the towels if they become soaked.
- Meanwhile, in a medium bowl, combine soy sauce, brown sugar, maple syrup, ginger, and cornstarch. Whisk until thoroughly mixed and set aside.
- Chop the dry tofu into 1-inch cubes or rectangles.
- In a large skillet over medium-high heat, bring the sesame oil to temperature, swirling to coat. Once the oil is hot enough that water droplets pop on its surface, add the tofu and stir to coat each piece with oil. Cook, stirring frequently, until lightly browned on all sides, about 5 to 7 minutes.
- Add the carrots and stir to coat them with oil. Cook for 3 to 5 minutes, stirring frequently, then add the green beans and stir to coat them with oil. Cook the mixture, stirring frequently, until the green beans appear bright and soft, about 5 minutes.
- Add the sauce and stir thoroughly. Cook for another 5 minutes, then remove the pan from heat and allow it to cool.
- Divide the cooled mixture in half. Place it in 2 labeled deli containers, and freeze.
- The night before cook day, place a container into the refrigerator to thaw.
- On cook day, remove the container from the refrigerator, remove the lid and replace it loosely on top of the container. Microwave on 50% power until hot, about 6 to 8 minutes (add an additional 4 minutes if you’re cooking both containers). For a thinner sauce, add a tablespoon of water to the container.
Serving Suggestions
Serve your freezer-friendly tofu stir-fry with white or brown rice. Remember to leave at least 20 minutes (longer for brown rice) to cook your rice on cook day.
8. Fluffy Make-Ahead Pancakes
This big-batch recipe yields almost 25 meals if you eat two pancakes at a time. It requires special equipment, such as a 20-quart mixing bowl (for the dry ingredients) and a 6-quart mixing bowl or larger (for the wet), which you can pick up from a local restaurant supply store. If you plan to make it often, that’s worth the investment. Plus, you can use the larger bowl to whip up big batches of other favorites, such as enough holiday party mix for everyone on your gift list.
Adapted from Modern Moms Kitchen Academy
Total Approximate Cost: $18.50 per batch, $3 per meal, $0.50 per pancake
Yields: 48 in 6 gallon-size zip-close bags
Prep Time: 15 minutes | Cook Time: 3 – 5 minutes | Total Time: 18 – 20 minutes
Ingredients
- 18 cups all-purpose flour = $6
- 1 1/2 cups sugar = $1.25
- 3/4 cup plus 6 tablespoons (or 1 scant cup) baking powder = $2
- 12 eggs = $2.50
- 3 quarts milk = $3
- 4 1/2 sticks butter, melted and cooled = $4.75
- 1 tablespoon vegetable oil
Directions
- In a 20-quart mixing bowl, thoroughly combine the flour, sugar, and baking powder.
- In a separate 6-quart or larger bowl, whisk the eggs to break them up, then whisk in the milk and melted butter.
- Slowly mix the wet ingredients into the dry ingredients until just combined. The batter should be lumpy and thick.
- Add the vegetable oil to a large nonstick saute pan or griddle and heat over medium-high heat. The pan is ready when water droplets sizzle on the oil’s surface.
- Use a ladle or scoop to drop approximately 1/4 cup batter into the pan (no more than 2 at a time if using a pan) onto the hot surface. Gently spread the batter to create circles no more than 1/3-inch high.
- When each pancake’s edges have set and bubbles on the upward-facing surface begin to pop, about 1 to 2 minutes, flip with a spatula and cook for another 1 to 2 minutes. The pancake is cooked when its center is firm to the touch. Remove the cooked pancakes from the pan and set them on a plate to cool.
- Repeat steps 5 and 6 for the remaining pancakes. If your pancakes begin to burn before they’re ready to flip, turn down the heat.
- Transfer the cooked pancakes onto several large baking trays, arranging them in a single layer. Place them in the freezer until they’re thoroughly frozen, about 1 hour.
- Remove the baking trays from the freezer and transfer the pancakes into 6 gallon-size zip-close bags. Label the bags and put them back in the freezer.
- On meal day, remove as many pancakes from the bag as you plan to eat and place them two at a time on a microwave-safe plate. Reheat each pancake in the microwave at full power for about 30 to 45 seconds, or until warm.
Serving Suggestions
To complete the meal, serve with one or more of the following toppings or sides:
- Butter and Maple Syrup. Top with as much butter or maple syrup (or both) as you’d like.
- Whipped Cream and Mixed Berries. For a sweeter experience, top with whipped cream and mixed berries, either fresh or thawed from frozen.
- Peanut Butter. Peanut butter, preferably in combination with butter and syrup, adds a savory profile and some protein.
- Bacon. Cooked bacon goes perfectly with buttered, syrupy pancakes. For easier batching, try this oven-baked bacon recipe from The Kitchn.
- Sausage. Breakfast sausage links pair well with pancakes and syrup. For a lighter alternative to pork sausage, use chicken or turkey sausage.
- Eggs. Round out the meal with savory eggs cooked your favorite way. I’m partial to Pinch of Yum’s scramble recipe.
Final Word
It’s a fact of life these days: Even if an aspiring home cook isn’t, their kids are often overscheduled. Even those who enjoy keeping busy can be forgiven for seeking a slower pace of life now and then.
Make-ahead freezer meals can’t run errands or handle work-related obligations. But they do make a significant impact when time is of the essence. These freezer meal recipes have certainly helped me and my family squeeze more precious moments out of our hectic weekdays. They don’t taste half bad, either.
Have you ever made freezer meals for your family? What are your favorite recipes?
Published at Tue, 01 Dec 2020 21:00:58 +0000


Comments
Loading…